Tuesday, August 18, 2020

Jungle Level Design

 Hey!  This month a great asset pack is free on the unreal marketplace.  So I decided I would take it and make something with it.  I wanted to make some type of aztec ruins where the player is overlooking a vast Jungle.  This is planned to be used in another prototype I have been working on.  Something with exploration of some ruins.  So I decided I would get started just by sketching out what I wanted.

I started off with a simple sketch to get a general layout in my head of what I wanted the player to see and focus on with some set dressing around it.


After this I decided to just block it out in Unreal:


I made sure to map out the player area in black.  Since this is a VR game, I wanted to make sure where the player could reach right away.  I don't often like to utilize teleporting so this helps me build things in reach of the player.


I laid out major landmarks in white cubes such as the player cliff, the Aztec temple, and rocks to block player view to the end of the world.  For the rest, I labeled green for the jungle.

After I was done with the greyboxing, I made sure to model the cliff the player was on.  I had a specific shape for the player and I wanted to cut a hole that the player platform will descend into.

I made this shape very quickly in maya.  I moved some faces and vertices around to make it look more cliff like.  I did all of this while matching the scale of the shapes I had put in unreal to make sure things lined up when I put them in.

With that, I was ready to  sculpt and vertex paint the cliff side in Unreal.  I decided to use Quixel since their awesome 4K library is open to Unreal devs.  Though I did have to adjust the streaming pool size of the engine since I exceeded the limit.


I also did little landscape and spline work for a river.

Afterwards, it all came together like this.


Side Note:  I really wanted to do some video recording, but UE4.25 seems to have a bug where the video is zoomed and stretched.  This is weird since I did a ton of VR recording in 4.24 no problem.  Hopefully it will be patched in the future.

This was a fun project I did over the weekend just to utilize a free pack and see where it took me in terms of a potential prototype.  I'm happy with how things turned out.  Looking forward to what this turns into!

Monday, August 10, 2020

At home recording studio

Recently I began recording audio for my VResume personal project.  I had the script figured out and a good mic I bought years back.  However, the first set of dialogue had some echo since I just recorded in my room.  I was able to use audition and other tools to reduce this, but it just didn't sound as clean as I would like.  Here is the first result:

https://drive.google.com/file/d/1ApAkYq-QLXUMjIXJ0Mip9Bl2FtCHzZwH/view?usp=sharing

So I wondered how I could remove that echo during recording without buying foam pads to put on my walls.  What is one to do when they are stuck in their apartment during a pandemic?  Well, I decided to use my bed sheets in my closet.

What I did, was take the comforter from my bed and put it above my clothes rack with some objects on top.  I order to close the space between the wall and the comforter, I nailed the side into the wall in several spaces. The result in below.


I hung the mic from the top of the rack.  Then I placed my laptop on the stool with a mobile pre.  Then, I shut the comforter and performed my recording.  The results speak for themselves.  Great way to think outside the box and save some money.  Here is the result:
https://drive.google.com/file/d/1-cQw_qeyVodgCtLl6RiWlvd7k9ed2kfK/view?usp=sharing


Building my own PC

 Hey!  It's been a long time since I posted here.  But quarantine has been wild so in my free time I've just been doing some new things while I'm not working.  One of those has been finally getting my own dev machine in my home.  This was a new experience since I built the PC myself.  It can be really intimidating to do, but luckily there are plenty of resources out there.  

Selecting parts

So I had no idea what I needed to buy.  All I knew is I wanted to not break the bank but make a PC that was powerful enough to run a valve index.  So I made sure to take a look at the recommended specs here:https://support.steampowered.com/kb_article.php?ref=4061-QUZB-4602

From there, I needed a guide to sort through the internet to find the correct parts for the best price.  Luckily there is a great resource called PC part picker (https://pcpartpicker.com/).  This made it very easy top get exactly what I needed.  The main focus was the CPU for multithreading and a graphics card that met the specs I mentioned.  Once I ordered the parts, they arrived like this.

The main problem after this was I had no idea how this all went together.  There really isn't a manual on how you build a PC!  So I looked around and followed a guide from a tech channel I watch often: https://www.youtube.com/watch?v=v7MYOpFONCU
This was really easy to follow along and before you knew it, I had my very own rig that I designed and built.

This was a cool project and did include some lessons I learned.  On top of the inner workings of a PC, I realized certain things later that just aren't communicated well.  When I started running VR, my CPU was getting really hot!  Around 80 on all cores which is way too hot.  So I made sure later to invest in another fan and cooler.  Now things run great!  Very excited to just make some personal projects with an index!.......if it ever gets here.  For now I settle for a regular Vive!


Sunday, June 11, 2017

Raspberry pi beginnings: Hardware, soldering, and installation

Hardware:
So, out of the box, I had realized that I made a huge error in understanding what all I needed for this project since I was working with the raspberry pi zero.  First problem was that we realized that the micro usb and micro hdmi ports required cables we overlooked.  The battery handled the micro power cable so that was not a problem.  We made sure to go out and get a micro HDMI cable and a micro usb converter.  This was honestly a huge oversight.  When working with hardware this small, it's important to remember to know exactly what you need.  Not just for the pi, but to develop on it.  Also in this time, I ordered a bread board with some wires to begin laying out the circuits for when we solder the rest of the pi.  After getting these pieces, my partner Cameron Schwach and I were ready to begin soldering the female header pins.

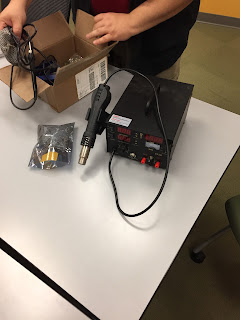
Lucky for me, Cameron had ordered a soldering iron of his own before even coming to FIEA.  We heated up the iron to 350 and began testing on another header pin before soldering for the actual pi.
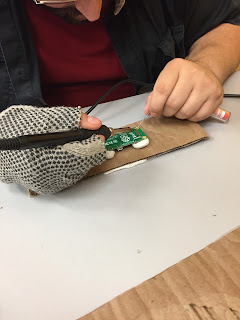
One other thing we realized was that with a pi this size, it became hard to get the solder onto the pins accurately.  Cameron realized we needed to use the flat head attachment for the soldering iron.  The correct technique to get the solder onto the pins is to hold the iron directly on the pin and then add then place the solder onto the hot iron.  This makes the solder become attracted to the pin and much easier to hand off.  The important thing to keep in mind is that the solder needs to create a bond for each pin to the gold ring pin holes on the pi.  

One word of caution.  The iron is very hot so a slight burn may not hurt that much, but you risk dropping the iron and potentially damaging what you are working on.  For this reason, it is wise to wear a glove on the hand that is holding the soldering iron.  Also, in order to keep the raspberry pi from moving around while you are soldering, we added sticky tac to the the bottom side and stuck it onto a piece of cardboard to keep avoid damage to the table were working on.


The soldering went very smoothly.  We successfully soldered on the female header pins to the bottom of the pi and had the finished product below:
With the header pins in place, I was ready to begin programming the pi to get some input from the buttons I had purchased.  However, the first step was to get the development software onto the pi.
I went with raspbian which you can install using noobs.  I followed the instructions on raspberry pi's website.

https://www.raspberrypi.org/downloads/raspbian/

Following the instructions was easy and I placed the OS on a micro SD card then I place that on the pi and booted it up.

When booting up the pi for the first time, you will be greeted with a screen to select the operating system to install.  I selected the raspbian option and booted up to the main screen.

One annoying thing before going forward.  The pi can only take one input to the usb at a time.  This said, you will swapping between the keyboard and mouse frequently so be prepared for that.


Bluetooth:
Now, one of the great things about the raspberry pi 0 is that it comes with bluetooth and wifi on the device.  But one thing to remember is that you need to install blueman in order to use bluetooth.  Install with the following command:

-sudo apt-get install blueman

When prompted (Y/N)? type Y and hit enter

Update:
This should handle installation for bluetooth functionality, however make sure that your software is up to date.  You can do this by entering the following command 

-raspi-config

This will open your config options  on the pi and you may see this screen


From here, you can do many things such as change your password to something you'll remember.  However, while we are here, go to the interfacing options to enable both your serial and ssh options.  These will be important for the next connection steps I will cover in the next post.

Lastly, update the pi with one of the options and then reboot the pi.

Bluetooth connection:
Now comes the cool part.  If you go to the bluetooth symbol on the top of the screen (Two over from volume) and click on it, you will see the option to make the device discoverable.  Do this and then go back to your computer and scan for bluetooth devices to add.

Note: your computer must have bluetooth in order to scan for it.

Once you find your device, click to add it.  You will then be prompted with a screen asking if the number of the pi is correct.  Click yes and then on your pi, it will say you have a request to join another device.  Click yes and what may happen your first time is that the pi will say there is an error and that you disconnected.  Nothing is wrong, you just need to try again.  Sometimes, the device will also give you an error after this step and it will wind up paired anyway.  Regardless, do not worry if it fails to pair the first time.  All other times should go smoothly.

Alright, you should have your device paired and you are ready like me to move on to the next step to program a serial port to begin sending data over bluetooth to your computer.  However, that is where this post ends.  We will cover Serial data and buttons in the next post.

More cools things to come!

Wednesday, June 7, 2017

Tracker Puck Struggles

I have begun using the tracker puck and have integrated it into unreal.  The process of installation and integration was very smooth.  In order to track the puck and attach it to an item, one must use the following node in blueprints.


One problem though, is that the puck does not just get assigned to the third tracked item in unreal.  There are now that many tracked items.  So, I needed to access the arrays of the objects tracked by type.  I discovered that the tracker puck is an invalid type object and is the first object in that array.  Once I grabbed the location of this item, it was easy to attach a static mesh to the puck and begin moving the ocarina inside of the room.


However, the tracker puck has some sort of offset with items in the room.  I still need to figure this one out.  For now, I have stuck with an offset of (-100, -50, 0).  The Z axis seems to be fine.  I have noticed that this same offset occurs with the hands and the camera if the ocarina is assigned to any of them.  Clearly, unreal must have some fix in their base VR blueprints that I need to dig for.  However, I needed to stay on schedule and focus on other things in order to hit my marks for this week.  I will post about them in another post.

Before I go, I will also urge caution to tracker puck users.  I was dissatisfied with the tracker puck not being treated as a controller by unreal.  Part of this was because I could not attach the puck to a motion controller like the hands for the Unreal VR pawn.  HTC had a fix on their site with a download for Steam VR to treat the tracker puck as a controller.  This can be found in the link here:

https://community.viveport.com/t5/Developer-Discussion/Vive-Tracker-Role-Changer-current-version-0-8/td-p/6602

Now, if you want the puck treated as a controller, this tool will get that done.  However, once it is converted, the puck cannot be changed back to a puck.  The tool does not support that.  I have reached out to HTC and did not get a good answer to this problem.  However, I will be asking the devs in their blogs.

That's all for the tracker puck.  More cool things to come

Wednesday, May 31, 2017

Tracker Puck

The tracker puck is the first piece of the controller to arrive!  HTC has released a tracker puck which can make other controllers visible in VR.  It's really cool.  The photos online do not do it justice.  This thing is small, compact, and so incredibly light.  I'm very surprised.


This makes things way easier than originally thought.  We originally opened a Vive controller and were going to use the trackers inside to make the pi into  Vive controller.  

If the tracker puck proves to not have the same functionality we were looking for, we will try and use the pieces from the controller instead.  Really excited to begin working on this project.  The rest of the pieces should be in later this week.

More cool things to come!


Personal Programming Project

Today marks the starting point of my next project that I will be making for the Programming 3 course.  I will be creating an object that you can interact with in the Zelda room I programmed for last semester.  My group is making the room into an escape room with several Zelda themed puzzles.  To take this project even further, I am creating an ocarina controller with a raspberry pi that will connect to the computer using Bluetooth.  We will also use a Vive tracker puck to have the item be visible in VR and out.


My presentation for the proposal went very well and I was funded for my project.

Here is the supplies I will be using and the links to them:

Raspberry pi 0: $9.95
https://www.buyapi.ca/product/raspberry-pi-zero-w/
Infared sensor: $1.76 for 1
http://www.robotshop.com/en/reflective-ir-sensor-470-10k-resistors.html?gclid=Cj0KEQjw0v_IBRCEzKHK0KiCrKMBEiQA3--1Nv_4n3EF6ErJaT_wCBipAlHLkpwnfNWwNSKAXrhzMh0aAsXk8P8HAQ
6 buttons from N64 controller
Tactile button pack X20: $2.50
Pin heads: $0.95
https://www.adafruit.com/product/366
Battery pack 5 volt: $14.95
https://www.adafruit.com/product/1959
Vive tracker puck - $115


The first step will be to solder the buttons on and begin programming the pi.  All of the pieces will be going inside of a 3D printed ocarina case.  Stick to this blog because part of the project requirements is that I am frequently updating my blog about my progress,  
Lots of cool things to come.